Mod Installation Guide

Introduction
This guide will explain how to use Arma3Sync, install mods for the first time and keep them updated. It also features general tips for troubleshooting and a brief FAQ.
Note: If you have any questions please contact an Interviewer. You can recognise Interviewers on TeamSpeak by their server group icon ![]() or on Discord by their @ Interviewer role.
or on Discord by their @ Interviewer role.
After completing this guide, contact an Interviewer as soon as possible to perform a Mod Assessment.
Step 1: Installation
Download and install Arma3Sync, after installation, boot up the program. Java Runtime Environment version 8 or newer is required.
Step 2: Directory Setup
In your Arma 3 installation location (or any other directory), create three new folders and name them «CNTO-Main», «CNTO-Campaign» and «CNTO-Dev». The last folder is optional and used mostly for collective mod testing.
Step 3: Addon Path
-
Click on the «Addon Options» tab.
-
Click on the blue «+» button in the top right corner.
-
Add the directory where the CNTO-Main mods will be installed.
-
Repeat these steps for the Campaign and Dev repositories.
Example directories:
…\steamapps\common\arma 3\CNTO-Main
…\steamapps\common\arma 3\CNTO-Campaign
…\steamapps\common\arma 3\CNTO-Dev

Step 4: Launcher Options
Click on the «Launcher Options» tab and confirm that the executable location for Arma 3 is correct:
…\steamapps\common\arma 3\arma3battleye.exe
Please tick the boxes as you see them in the picture below. If you have multiple Arma 3 profiles you should select the profile that corresponds to our username convention.
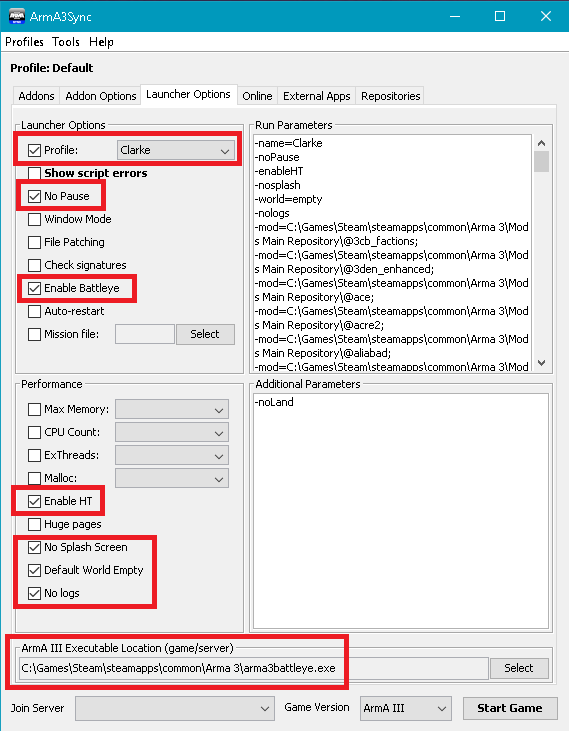
Note: Please make sure to close down Arma3Sync afterwards to save the settings. The «Run Parameters» on the right side is being automatically updated.
Further information on startup parameters:
Max Memory
This is being auto-detected.
Arma will use all available system memory.
CPU Count
This is being auto-detected.
Using additional cores might impact stability.
exThread
This is being auto-detected.
Using additional threads might impact stability.
Malloc
Arma is always updated to the latest TBB malloc.
Default may therefore be the most optimal.
Enable HT:
This is ignored by non-HT CPUs.
Furthermore this tweaks the autodetection to CPU Count.
Huge pages
Used for enabling large page-file, stored on the hard drive.
No significant FPS gain (approx 1).
Step 5: Add the Repositories
-
Click on the «Repositories» tab.
-
Click on the blue «+» button in the top right corner.
-
Copy & paste the URL shown below into the «Public Auto-Config URL».
-
Press the «Import» button. After a short period of time, the rest will be filled out for you.
-
Press OK.
-
Repeat these steps for the Campaign and Dev repositories.
Public auto-config URLs:
https://repo.carpenoctem.co/main/.a3s/autoconfighttps://repo.carpenoctem.co/campaign/.a3s/autoconfighttps://repo.carpenoctem.co/dev/.a3s/autoconfig
Step 6: Download the Repositories
-
In the «Repositories» tab, select a CNTO repository (Main, Campaign or Dev). Optionally you can tick notifications and automatic updates for your repositories.
-
Click on the «Connect to Repository» button.
-
A new tab opens named after the previously selected repository.
-
Click on the «Default Destination Folder» drop-down menu and select the corresponding directory we created in step 3. If you do not see any destination folder or you are missing some, repeat step 3 of this guide.
-
Tick the «Exact Match» option.
-
Click on the green check mark to start checking for addon updates.
-
When the check for addons is complete tick «Select All».
-
Click on the «Download Addons» button.

We always post mod repository updates in the Community Announcements topic A3Sync Repository Status. After your initial mod repo download you will only have to repeat steps 6.6 - 6.8 for each consecutive repo update.
Note: If you are downloading the repositories for the first time it may take quite a while to complete. Sometimes during the download, Arma3Sync might lose connection with the repository server or freeze up. Simply restart the Arma3Sync and repeat steps 6.6 - 6.8. The download will resume where it left off, you will not have to start all over again. Our repositories are hosted on the game server. Do not download/update mods during Arma 3 events. It may negatively impact server performance for other players.
Step 7: Setting Up Optional DLC
Arma 3 offers two categories of downloadable content which have to be set up correctly in order to work in multiplayer.
Default DLC
This content is always automatically downloaded to your machine, regardless of your ownership. Thus these DLCs do not have to be manually loaded for multiplayer.
Optional DLC
This content needs to be manually loaded in order to work properly in multiplayer. Ownership is required to download the DLC.
- Contact
- Global Mobilization
- S.O.G. Prairie Fire
- CSLA Iron Curtain
- Western Sahara
- Spearhead 1944
- Reaction Forces
- Expeditionary Forces
Loading “Older” Optional DLC in A3Sync
Note: The method below only applies to the optional DLCs Contact, Global Mobilization, S.O.G. Prairie Fire, CSLA Iron Curtain and Western Sahara.
-
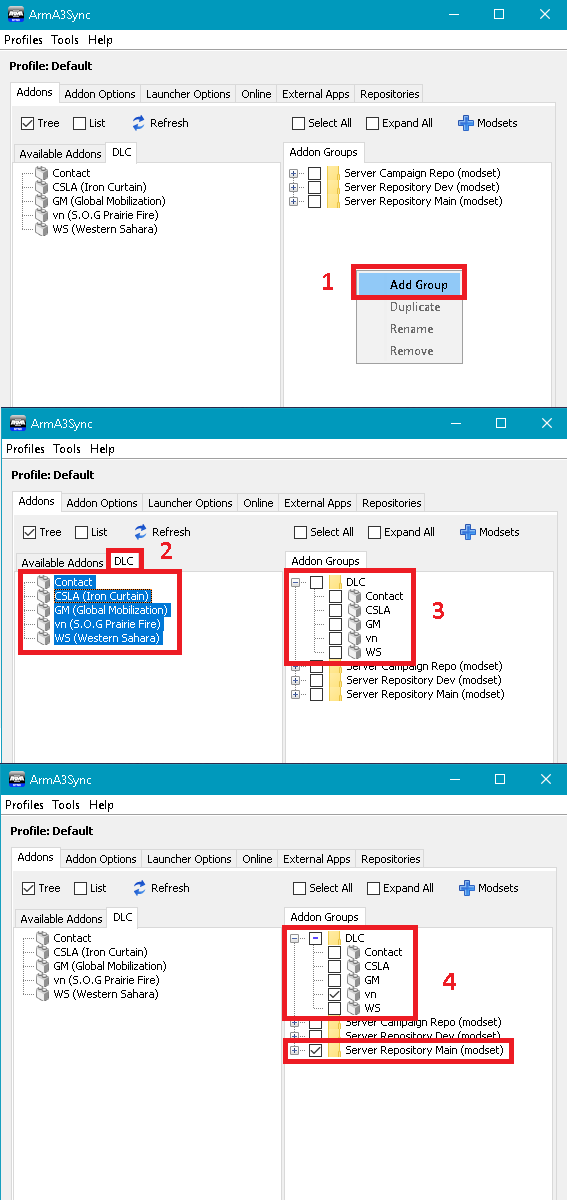
In the «Addons» tab navigate your cursor to the «Addons Groups» sub-tab. Right-click into the empty space and select «Add Group». Name the new group «DLC» and press «OK».
-
Click on the sub-tab «DLC» and select all optional DLCs you own.
-
Drag the optional DLCs into the new addon group «DLC».
-
You can now select optional DLCs. In this example, the game will be started with the Main Repository & S.O.G. Prairie Fire DLC.
Loading “Newer” Optional DLC in A3Sync
Note: The method below is only required for the latest optional DLCs Spearhead 1944, Reaction Forces, Expeditionary Forces.
-
In the «Launcher Options» tab navigate your cursor to the «Additional Parameters» text field.
-
Left-click into the empty space and type the respective DLC parameter:
-mod=spe;for Spearhead 1944-mod=rf;for Reaction Forces-mod=ef;for Expeditionary Forces
Step 8: Starting Your Game with Mods
-
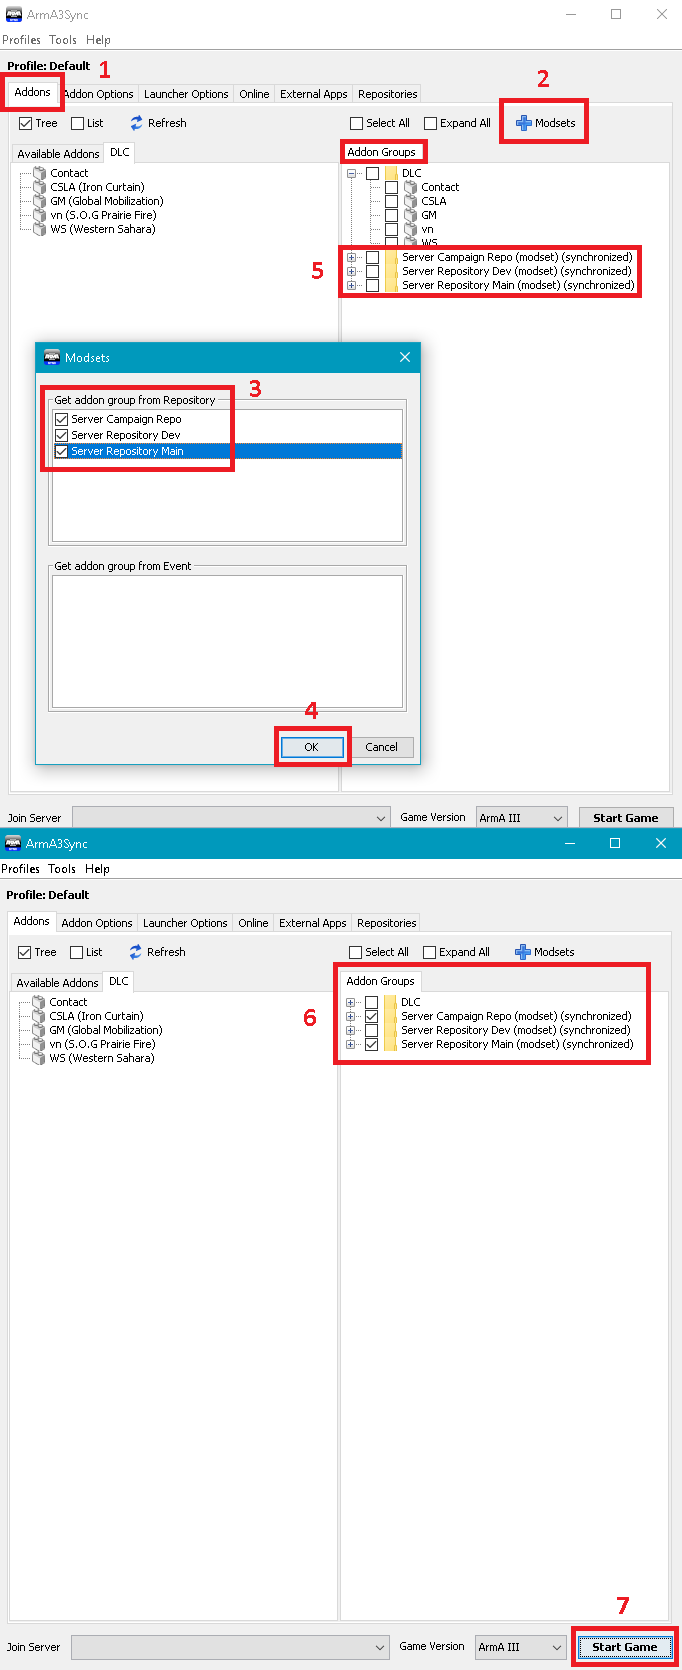
Select the «Addons» tab.
-
Click on the blue «+ Modsets» button in the top right corner.
-
Tick all available repositories (Main, Campaign and Dev).
-
Click «OK» to confirm your selection.
-
The selected repositories now appear in the «Addon Groups» window.
-
Tick the necessary repositories/optional DLC required for the op.
Note: The vast majority of our operations require only the Main Repository. We always post the repository/DLC requirements in our OPORDs.
- Make sure the «Join Server» drop-down menu is empty and press «Start Game».
FAQ
Troubleshooting
If you run into any issues, please troubleshoot your system before contacting an Interviewer.
- Double-check if you have followed the Mod Installation Guide correctly.
- Restart your PC.
- Restart Steam.
- If you have previously played Arma with Steam Workshop mods: double-check if all Steam mods are disabled.
- Verify the integrity of Arma 3 game files.
- Restart TeamSpeak3 and run it as admin.
- Restart Arma3Sync and run it as admin.
- Make sure the mod repositories are up-to-date (Step 6).
- Check if the correct repositories/optional DLCs are loaded (Step 7 and Step 8).
Should I update TeamSpeak when a new version is published?
No. TS3 updates are not always compatible with the latest release of ACRE2 plugins. As a general rule never update TeamSpeak unless it was recommended in the #community-announcements category.
Note: Currently, TeamSpeak 5 does not offer the required API to work in conjunction with ACRE2. Thus, for the time being, only utilise TeamSpeak 3.
I have updated my TeamSpeak client by accident; how can I roll back to a previous version?
You can find all previous TS3 client versions here.
Why do I get immediately disconnected from the server?
The most likely explanation is that either your mod repositories and/or optional DLCs are not loaded correctly.
- Restart Arma3Sync and run it as admin.
- Wait ca. 10 seconds for the application to start up.
- If optional DLC is required repeat Step 7.
- Repeat Step 8.
Why do I receive an ACE3 error message and/or see a big red box on my screen after joining the server? Why do I see other players in underwear / holding invisible weapons?
You might be running additional client-side mods or an incomplete mod repository.
- Restart Arma3Sync and run it as admin.
- Repeat Step 6, double-check that the «Exact Match» option is ticked.
- Repeat Step 8.
Why can I hear everyone talking in-game independent of their location?
The ACRE2 plugin for TeamSpeak is either disabled or incorrectly installed. It is also possible that a TFAR plugin is causing a conflict with ACRE2.
-
Open TeamSpeak, navigate to Tools\Options\Addons\Plugins.
-
Double-check that the ACRE2 plugin is enabled.

- If you had Task Force Arrowhead Radio (TFAR) previously installed, make sure that the corresponding TeamSpeak plugin is disabled.
Why am I unable to hear anyone talking? Why are people not able to hear me? Why am I unable to interact with radios in-game?
The ACRE2 plugin for TeamSpeak is either bugged out or your system security is interfering with the plugin. It is also possible that a TFAR plugin is causing a conflict with ACRE2.
-
Launch TeamSpeak as admin, navigate to Tools\Options\Addons\Plugins.
-
Press the «Reload» button for the ACRE2 plugin.

-
- If you had Task Force Arrowhead Radio (TFAR) previously installed, make sure that the corresponding TeamSpeak plugin is disabled.
- If you had Task Force Arrowhead Radio (TFAR) previously installed, make sure that the corresponding TeamSpeak plugin is disabled.
Why does my game suddenly drop to single-digit FPS?
It is possible that your custom launch parameters are causing FPS drops. Try out our recommended settings described in Step 4.