Coop - Operation Olympus

Map: Malden
Time: 04:40
Weather: Clear
Host: [user avatar=“https://assets-cloud.enjin.com/users/17914993/avatar/small.1493754072.png” name=“Arba”]17914993[/user]

OPORD

I Situation:

Fighting between European Federation of Independant Democratic Republics (European Federation for short) and the Russian Federation has come to a stalemate, with both sides controling roughly half of the island. EF forces have mounted several offensives in the past, but were repelled each time due to heavy bombardment of Russian self propelled guns located in Larche.

EF forces will attack from three directions, driving the Russian forces away from the mountain range roughly in the middle of the island which will give Task Force Noctem an opportunity to slip in between enemy lines. Right before Larche is town of Arudy, used by Russians as a major logistic centre to supply their front lines. You are to capture the town of Arudy, use it as your FOB while locating and destroying the SPG-s, and destroy all enemy supplies before abandoning the town.

High speed boats will be sent to LZ Poseidon to exfil you once you eliminate the SPG-s. Be aware that there are reports of experimental Russian armour being tested in the field. Eliminate it if the opportunity shows itself.

Friendly Forces:

[indent][list]
[] Task Force Noctem
[
] EF Army
[/list][/indent]

Assets:
Light vehicles suitable for off-road

[indent][list]
[] 6x Land Rover
[
] 2x Land Rover (M2)
[*] 1x Land Rover (SPG-9)
You are allowed to use captured Russian vehicles as no friendly forces will be operating in the area.
[/list][/indent]

Enemy Forces:

[indent][list]
[*] Russian Federation
Presence of Russian military personnel is expected to be minimal due to EF attacks, but expect a stiff resistance due to importance of the SPG battery.
[/list][/indent]

Civilians:

[indent][list]
[*] Civilians in Arudy have been evacuated, but the town of Larche hosts a large populace
[/list][/indent]

II Mission:

[indent][list]
[]Capture and hold the town of Arudy
[
]Destroy enemy vehicles and supplies located in Arudy before abandoning the town
[]Locate and destroy the artillery battery located near Larche
[
]Exfil from LZ Poseidon
[/list][/indent]

III Execution:

Commander’s intent

[indent][list]
[*] Destroy the artillery battery near Larche[/list][/indent]
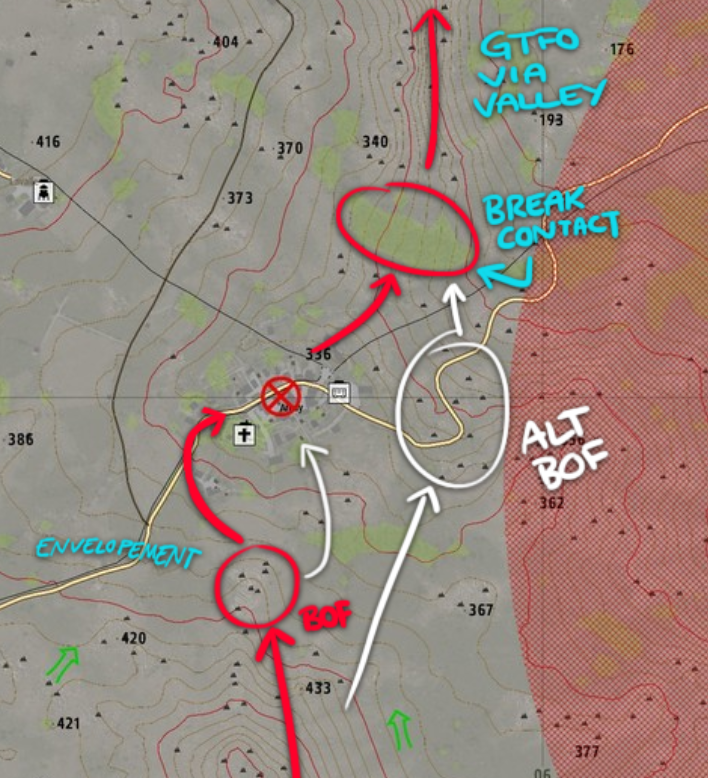
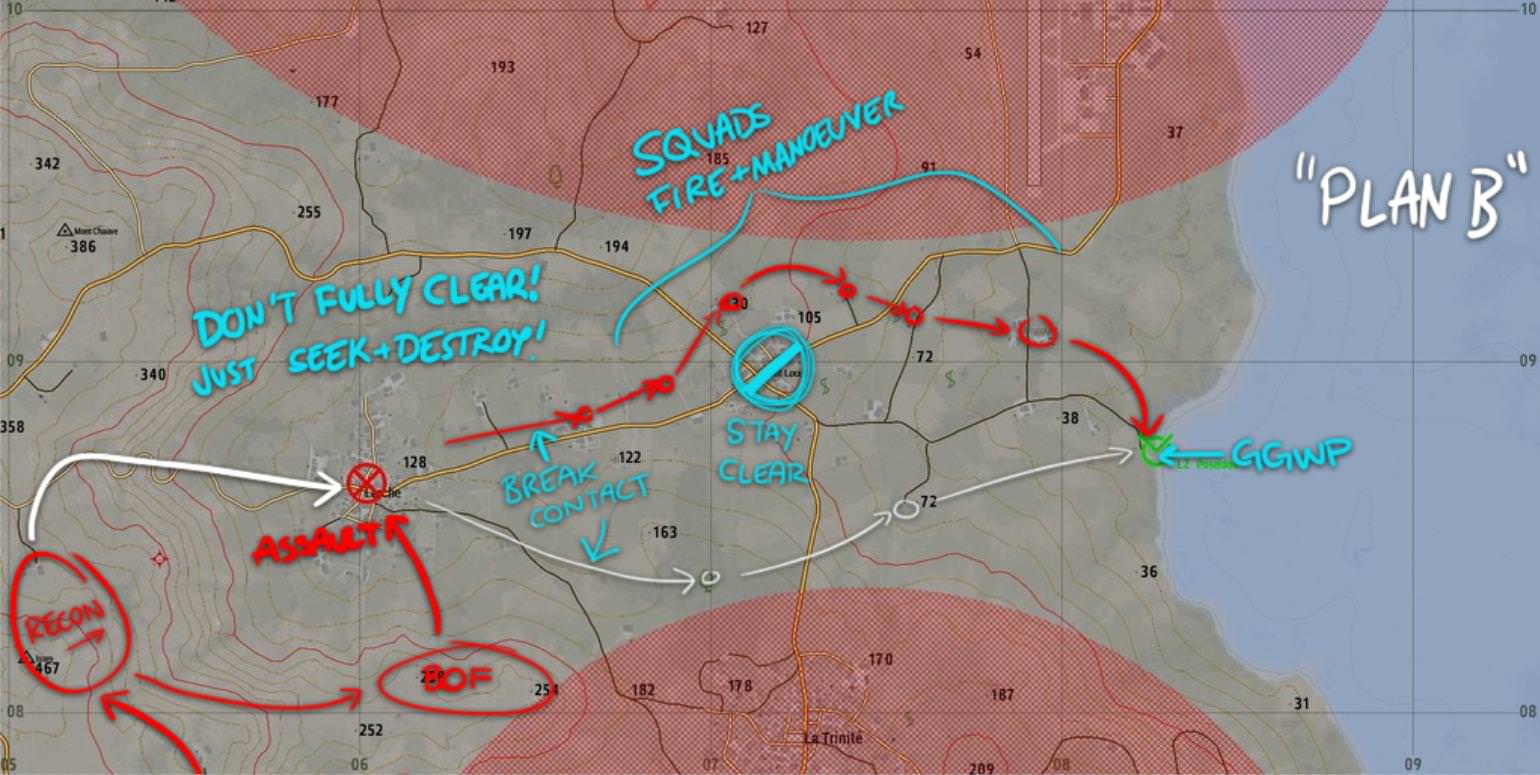
Movement Plan

[indent][list]
[*] All tactical decisions are left to the TFNs leadership on the ground, however several optimal paths over the mountain range are offered [/list][/indent]

IV Administration / Logistics:

Resupplying

[indent][list]
[*] No option of ressuply.[/list][/indent]

Reinforcements:

[indent][list]
[] At predesignated times, reinforcements will be sent out of the base in smallest transport vehicle which can hold reinforcements
[
] Upon insertion to the AO, reinforcements should stick together until regrouping with the main force in the AO
[*] Players awaiting for reinsert are tasked with holding the town of Arudy.
[/list][/indent]

Area of operations:

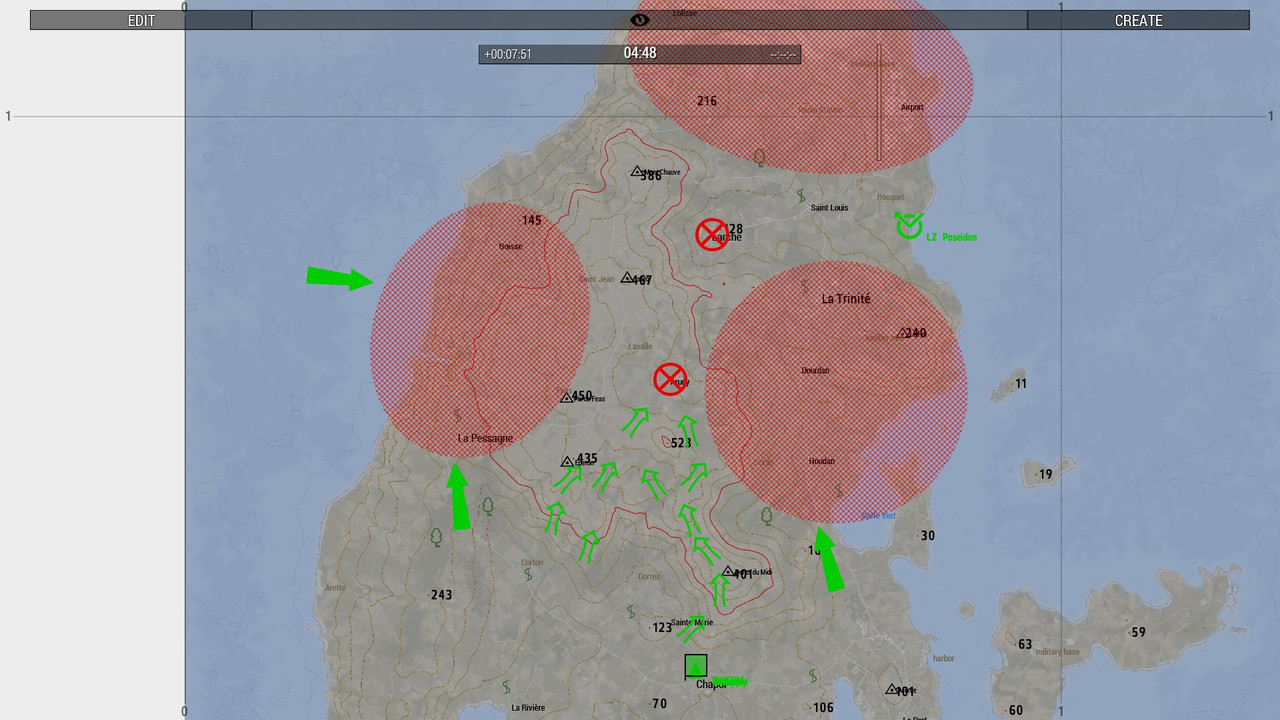
More detailed maps: Photobucket | Make your memories fun!

[s]This plan is made for two full squads of infantry. MAT or MMG could be used too. There’s potential that the M2 Land Rover could be used by Alpha (Or whichever squad ends up on Overwatch) to provide additional firepower, but I don’t think it’s necessary.

First part, from LZ to Larche should be done as quickly and quietly as possible, since there’s very open ground, with heavy enemy forces on both North and South.

Second part, attacking Arudy, perform a strange kind of inverted deep envelopment, where the BOF element goes behind the enemy, scouting as they go. If Alpha is able to find multiple good BOF locations, all the better, so the town can be covered from multiple angles by moving between them, or splitting the squad. Once Bravo has established themselves in the town, and made good progress clearing buildings, and Alpha is no longer useful at their BOF, Alpha should move down into the town to assist with clearing.

All throughout the mission, we should be trying to capture an enemy transport vehicle if possible. Hopefully there’ll be one in Arudy with the rest of the enemy supplies, but if not, we’ll have to improvise. We can use these vehicles to retreat back along our footsteps back to the LZ to be picked up by the boats.[/s]

The BoFs might be a bit far away to be effective. But they can be good recon points to better assess the terrain.
Also, why not use the SPG-9 Landrover at the BoF? Could be handy to get rid of infantry & vehicles alike before the assault starts.

Good point, might be too far away, but the squad lead can figure that out and see if there’s any decent positions nearer to the town when they get there.

We should definitely keep the SPG Landrover nearby in case we find a good situation to use it.

[user avatar=“https://assets-cloud.enjin.com/users/16385839/avatar/small.1599350353.jpeg” name=“Jash”]16385839[/user] , [user avatar=“https://s3.amazonaws.com/files.enjin.com/821401/site_logo/small.png” name=“Stuka”]17454636[/user] , LZ poseidon is to be used for exfil.

From OPORD: "driving the Russian forces away from the mountain range roughly in the middle of the island which will give Task Force Noctem an opportunity to slip in between enemy lines"

"High speed boats will be sent to exfil you once you eliminate the SPG-s."

"All tactical decisions are left to the TFNs leadership on the ground, however several optimal paths over the mountain range are offered"

I will edit the OPORD now to make it more clear.

Silly Jash, better start over!
Didn’t even notice the plan started at the exfil… Mondays are difficult…

Oh you don’t have to start over. Just change the direction of the arrows :slight_smile:

Whoopsie. I thought we were using the same LZ for Insert and Exfil.

Let’s try again - Alternate plans drawn in white:

Phase one is fairly simple and self explanatory. If the main BOF turns out to be unsuitable, the White BOF could be better, but it’s a little bit close to the danger zone on the east. Attack from the east flank is likely, and getting caught between the east flank and the hostile city would be a very shitty situation.

After the enemy’s supplies have been destroyed or stolen, we should use the forest at the south end of the valley to cover our retreat, aided by fire-and-manoeuvre and smoke grenades, as we run through the narrow valley, to keep us moving relatively quickly and safely to the next objective.

In phase two, we’ll use the very high ground at the WSW of the city to recon the whole area and try and spot the artillery position. The ground from this position is probably too steep, and open to assault through, so we should then move west to the BOF marker instead, which still has a height advantage (Not as much), but has a much shallower slope, and probably better cover. If this turns out to be a shit route too, we could attack along the Main road from the West, but that certainly isn’t preferable, and the Recon marker is probably outside of effective range, so another BOF would have to be established closer to the objective.

After destroying the artillery, we should move out straight towards the LZ, moving between compounds, bounding Squad over Squad, and breaking contact if possible. We should absolutely avoid Saint Louis; no reason to get bogged down by MOUT when we’re trying to extract. If the main bulk of the enemy forces are coming from the north, then I suggest the southern, white route instead, but there appears to be less cover along that route. Securing enemy transport vehicles along the way certainly wouldn’t hurt either, and they could be used to transport any injured troops quickly and safely to the LZ to be treated.