Coop - Lit Candle


This mission tries to simulate operating as a part of larger unit (company). Players operate as a single platoon along side the 2 simulated ones. With off-screenshot battalion and brigade simulation. When making a plan your goal should be to plan how to get your platoons tasks done, which landscape to use and etc. For example on the ambush actually try to plan out how would you conduct the ambush in the area. On defense how would the placement work. How would one use the gear provided to its maximum? How to be as efficient of an unit as possible? I hope number of the freshly trained leadership role players will try to have a go at planning.

Map: Chernarus
Time: 0900
Weather: Slight overcast
Host: [user avatar=“https://assets-cloud.enjin.com/users/16558368/avatar/small.1471276874.jpeg” name=“zcribe”]16558368[/user]

OPORD

I Situation:

Enemy Forces

[indent][list]
[] 4th motorised militia batallion is currently prepearing to assault the Berezino defense line from south along the 07 paralel.
[
] US army 2nd tank platoon and US army Charlie infantry company will reinforce positions militia is unable to take over.

[/list][/indent]

Friendly Forces:

  • 44th motorised rifle batallion will conduct a defense on the Berezino line.
  • B-COY will conduct a defense between the paralels 07 and 10.
  • 2nd platoon will be between 1st and 3rd infantry platoon.

Assets:

[indent][list]
[] 3x IFV BMP-3
[
] 4x Truck GAZ-66
[/list][/indent]

Civilians:

[indent][list]
[*] Evacuated from the area.
[/list][/indent]

II Mission:

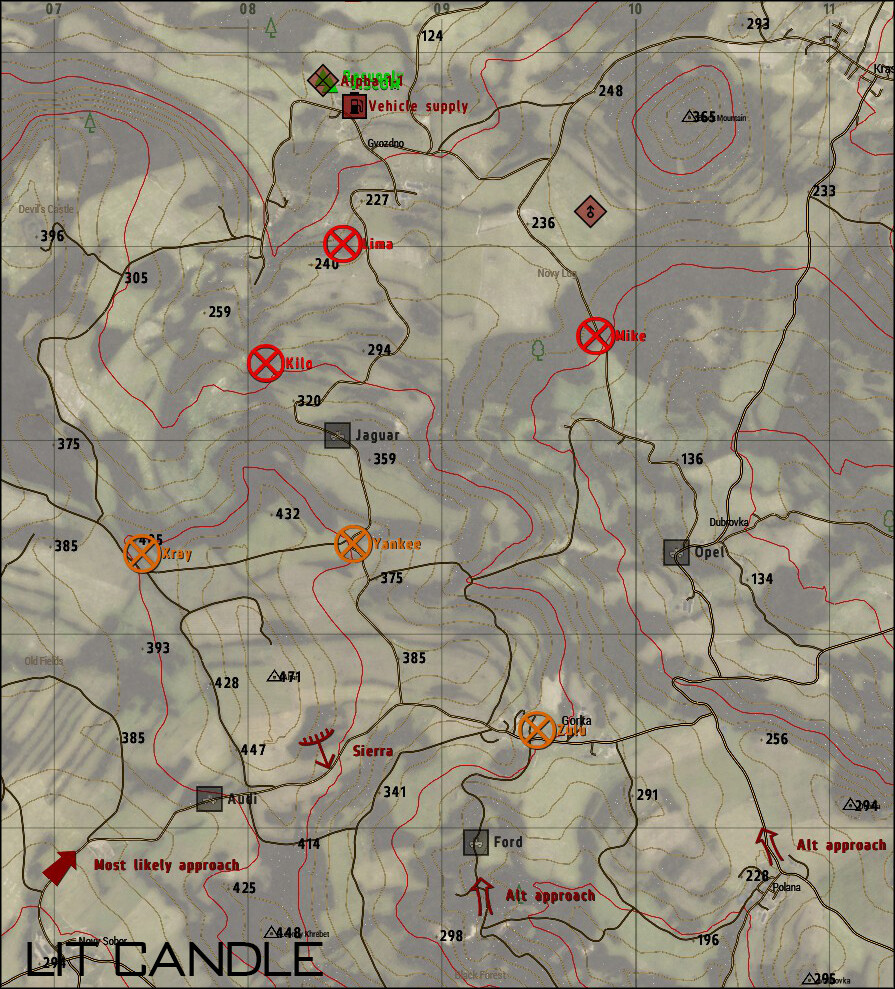
Second platoon will conduct a defense on the Berezino line NLT S+30M to halt the assault of the enemy forces in the Chernarus area.

III Execution:

Commander’s intent

[indent][list]
[*] Comapany commander intends to stop the enemy forces on Berezino line by conducting a standard
2 foward 1 reserve defense. Seperating the positions into 2 seperate lines of Yellow and Red.
Each platoon has been assigned 2 position markers that will be entrenched and defended. Second platoon
will conduct an ambush on the enemy recon forces.
[/list][/indent]

Movement Plan

[indent][list]
[] Move to positions Lima and Yankee and do a quick visual overview on the area.
[
] Move to Ambush marker Sierra.
[*] After ambush or on order move to position Yankee.
[/list][/indent]

Fire Support

[indent][list]
[*] 81mm organic mortar support 1 DOS (Vanilla menu)
[/list][/indent]

Tasks

[indent][list]
[] Conduct a planned ambush at the Sierra marker to destroy enemy recon unit.
[
] Defend and entrech a postions Yankee and Lima.
[*] Operate as a reserve unit in position Lima ready to assist 1st or 3rd platoon on order.
[/list][/indent]

IV Service support:

Miscellaneous:

[indent][list]
[] Leftover engineering equipment (razorwire, AT mines, explosives)
[
] Squad AT riflemen have been ewuipped with entrenching tools, explosives and Claymore directed charges.
[/list][/indent]

V Administration / Logistics:

Resupplying

[indent][list]
[] Vehicle resupply, rearm and repair station available and marked accordingly.
[
] Infantry supply boxes
[/list][/indent]

Reinforcements:

[indent][list]
[] At predesignated times, reinforcements will be sent out of the base in smallest transport vehicle which can hold reinforcements
[
] On orders of HQ reinsertion can be organised outside of the usual schedule limitations.
[*] Upon insertion to the AO, reinforcements should stick together until regrouping with the main force in the AO[/list][/indent]

Area of Operations:

This is one hell of an OPORD. Well done!

[user avatar=“https://assets-cloud.enjin.com/users/16558368/avatar/small.1471276874.jpeg” name=“zcribe”]16558368[/user]

If I may, you should add some phase lines to the image:

  • Company FEBA (forward edge of the battle area)
  • Company AO and 2nd platoon boundaries
  • Company MBA (main battle area)
  • FSCM (fire support control measures) for mortar application
  • Company engagement area
  • Company disengagement line

It would help a lot and people will learn something from this mission.


upload pic

Hopefully this covers the objectives in a proper manner & the positions chosen are adequate (I don’t the map very well):

  • Ambush (Initial deployment is marked in Black)

–> Standard convoy with BMP & GAZ trucks.

–> Once at Yankee, a small detachment in a GAZ truck will leave the convoy (Left turn) to prepare the explosives at the blue markers.

–> The remaining elements will push South past Xray, the BMP will take the road on the right and hold in defilade at the red marker. Infantry will take the left road to the dismount marker and proceed on foot to the OW position.

–> The assault team will push South and set explosives on the road at the blue marker.

–> Infantry detonates the explosives & engage the enemy recon team. BMPs may be called in support as needed.

  • Fall back to Yankee (Yellow lines) & occupy marked positions, infantry split in 2 teams to cover larger area & hopfully set a crossfire.

  • Fall back to Lima (Yellow lines)

–> Inf1 moves first will Inf2 provides cover. All transports should be set at the Regroup marker before having to retreat.

[indent]–> Set explosives at the Blue marker & occupy identified positions, once again infantry split in 2 teams.

Plan described from south to north as follows:

First phase:

  • ambushing forces will set up on the hill next to the first BMP marker. BMP should be in close proximity and only used in case of emergency
  • Explosive should be placed on the side of the road and detonated for maximum impact of the ambush
  • Remaining forces will set up defences(trenches) and positions south of XRAY at the yellow line.
  • Ambushing forces will regroup at the RGR marker after the ambush and together with BMP will leave towards XRAY.

Second phase:

  • Forces will retreat towards Yankee, as soon as the retreat order is given.
  • Engineers can leave early to prepare the defensive position.
  • Engineers will also setup mines behind yankee and activate them when the retreat from phase two is called.

Third phase:

  • Mines above Yankee will be activated and forces will retreat towards the next line.
  • I advise a retreat of a part of the forces first, to setup the last line, in order to not get steamrolled by the enemy.
  • Mines will again be placed north of the line and activated when the retreat order is called.
  • OW position should also be held on high account by the commander, as the enemy might flank from Mike at this point

Last phase:

  • pretty straight forward
  • again I advise engineer team and one squad move in first to cover the retreat of the remaining forces and stop the enemy from their pursuit.

[quote user_id=“13688253” avatar=“https://assets-cloud.enjin.com/users/13688253/avatar/medium.1433248519.jpeg” name=“Highway”][user avatar=“https://assets-cloud.enjin.com/users/16558368/avatar/small.1471276874.jpeg” name=“zcribe”]16558368[/user]

If I may, you should add some phase lines to the image:

  • Company FEBA (forward edge of the battle area)
  • Company AO and 2nd platoon boundaries
  • Company MBA (main battle area)
  • FSCM (fire support control measures) for mortar application
  • Company engagement area
  • Company disengagement line

It would help a lot and people will learn something from this mission.[/quote]

Good point. Sorry, been bit busy. I had planned to make a secondary image to help you or anyone else do planning but I just haven’t had the time.