In 2020 the Maldesen government was overthrown in a bloody coup by their armed forces, and the leader of the armed forces took command. The leader of the military, now known as the Supreme Commander General of Maldesen Free Forces - Sal Ami. Rules the island with an iron fist. He has been at odds with the world since then but managed to avoid armed conflicts. Sadly that ends today.
OPORD
I Situation:
During a Freedom of Navigation Operations in international waters around the island of Malden, the USS McFaul came under missile attack from 2 airplanes and took heavy damage, they suffered a crew loss of about 30 percent. Sal Ami says that Malden only defended their own territory and lays all the blame on us. President Leclerc has declared that this cowardly attack during a peaceful navigation through international waters is an act of war and that Sal Ami and his followers will feel the full might of the US armed forces.
173rd Airborne Brigade and Carrier Strike Group 10.
Artillery support and Cruise Missile support from USS Stout.
Reslupply support from USS George H.W. Bush.
Assets:
Explosives
Enemy Forces:
Maldesen Free Forces
Civilians:
Yes
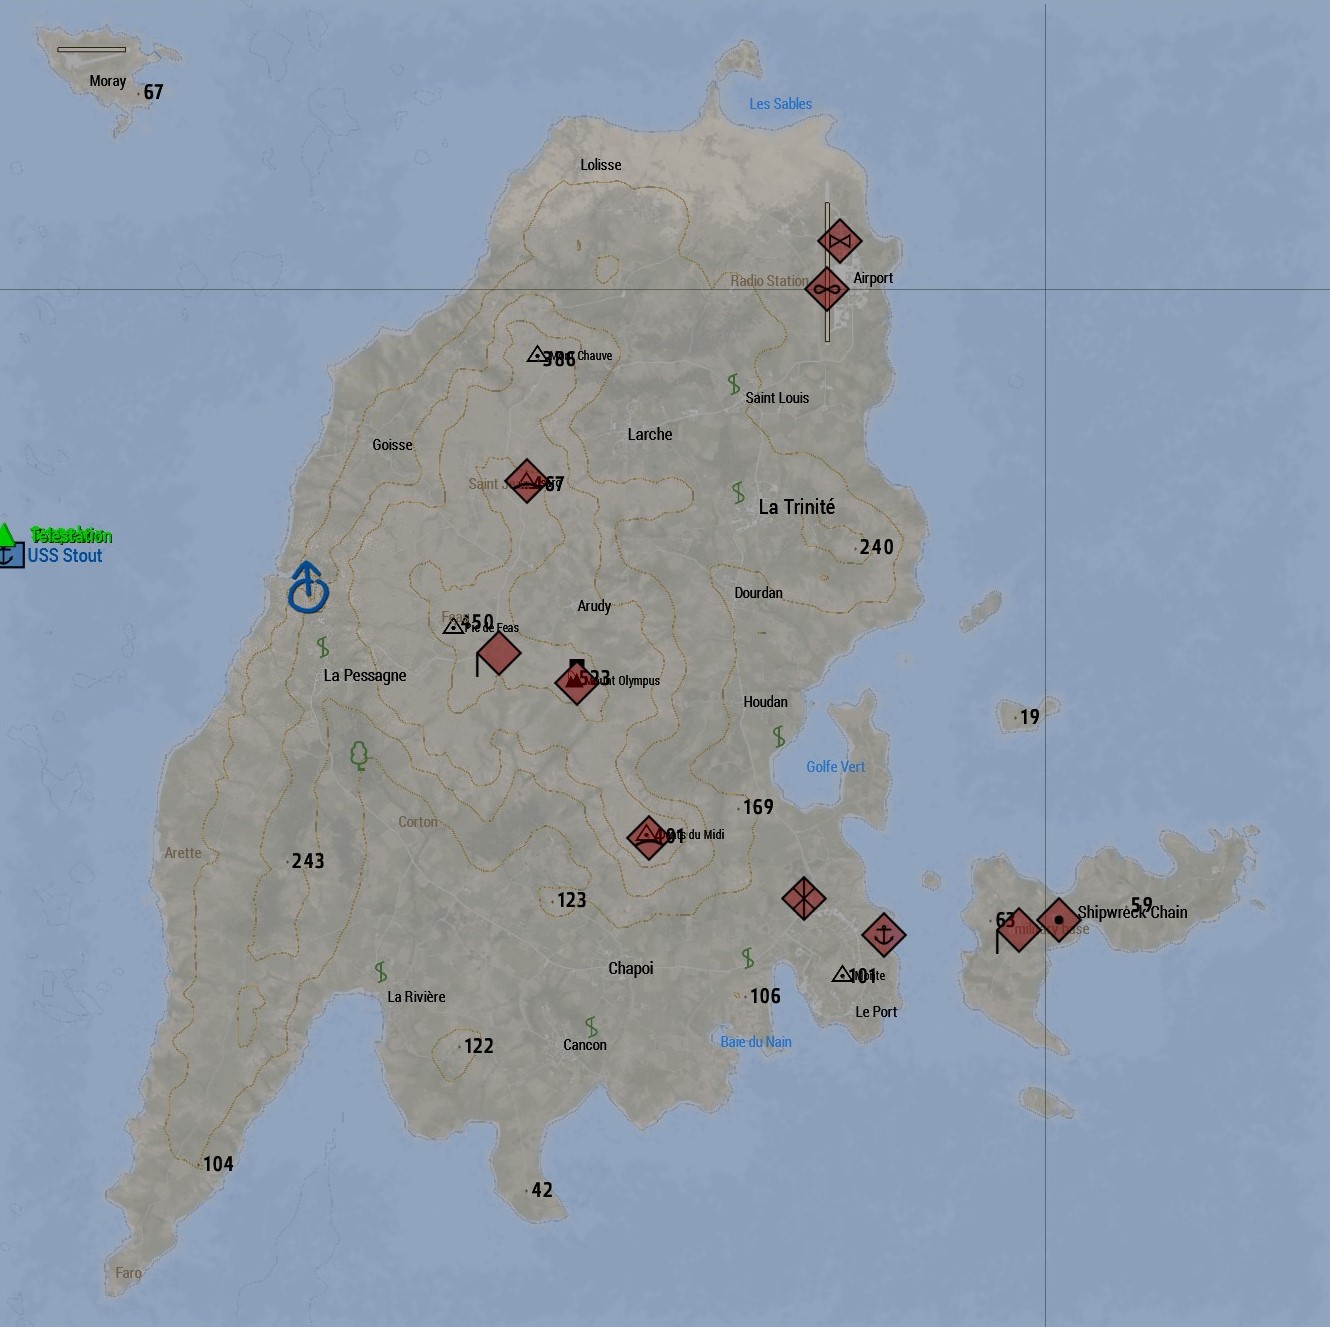
II Mission:
1st Battalion mission is to disable Malden’s coastal battery and air defense in the southeast and claim their military bases. CSG 10 will knock out the airfield in the north when the AA-sites are offline. 2nd Battalion will after that clear out the airfield and move on the town of La Trinite.
III Execution:
Commander’s intent
Disable the radar site at Mount Olympus.
Disable the 2 known AA sites.
Secure military compounds in the southeast.
Silence the naval guns at Shipwreck Chain.
Movement Plan
At PLT’s discretion.
Fire Support
Mulligan - Artillery support is available through Simplex after radar station is offline.
Call Me Maybe - Cruise Missile support is available through Simplex after radar station is offline.
Optional Tasks
None as of mission brief.
IV Administration / Logistics:
Resupplying
Lady Ace and Knightrider - Reslupply support is available through Simplex after AA sites are offline.
Reinforcements:
Reinsertions will be on the hour every hour and be adhered to strictly, no deviation is allowed.
Reinsertions are the same for all, including vehicles teams.
Platoon Commander has a one time reinsertion wild card at his disposal, call this in through HQ.
At predesignated times, reinforcements will be sent out of the base in the smallest transport vehicle which can hold reinforcements.
At predesignated times, an air transport will be sent out to pick up reinforcements from the base.
At predesignated times, an armed escort vehicle will be sent out to escort reinforcements from the base.
Upon insertion to the AO, reinforcements should stick together until regrouping with the main force in the AO.
Feedback: This operation was fun to play, though Team Alpha could have followed formations better.
QCB could have been improved, but the thoughts of the operation were fun.
Yellow Team lead POV: In hindsight the initial assault on the enemy base was unfortunate for Alpha as the terrain did not favor us as we thought it would. Even though the supporting weapons teams provided a lot of firepower, throughout the OP i noticed that most of the time they were too far away, or not in the right place at the right time to provide Alpha with effective covering fire.
But given the difficulty of the OP and the tools we had we still managed to push through and get a good end result. I’m proud to say that despite one mistake on my part (opening a door at the wrong time) and getting an unlucky headshot, yellow team had 0 deaths.
All in all happy with the OP, thanks for hosting Longbeard.
I had a great time this op. Throughout the majority of the operation the two support teams occupied different positions further back and that’s exactly how it should be. We were kept apart from Alpha to cover their flanks/rear, create overlapping fields of fire and increase the overall situational awareness. @Karl and @Mattdogs did a great job relaying contact reports to the rest of the platoon and keeping our blind spots to a minimum.
We often took care of threats that were approaching the flanks of Alpha but rarely got a chance to do more damage because we managed to spot them early and take care of them. I saw MMG mowing down several groups of enemies which could have been a real problem if they had managed to get closer.
The ideal engagement range of MAT is 500-600m where we spot the enemy early, have time to properly range and engage them without taking casualties ourselves. If we’d be closer to Alpha, especially during infantry/urban combat it’s far more likely that enemy vics can roll up unimpeded to the platoon or MAT being downed in close-range engagements. The prime example is the assault on the harbour town where we were forced by the terrain to move in closer/parallel with Alpha which cut our sight lines significantly due to the urban setting and it took us a moment to find the IFV and eliminate it.
Like @Clarke said, MMG was given great positions by @Teddy on the first FOB assault which provided us with great overwatch. @Guy and @Sagu worked well together, providing feedback to each other to adjust fire for accurate suppression.
Prior to the Radar site attack, @Arba again found a good position for MMG to take up to cover the assault of Alpha, though, unluckily one AI survived suppression from both MMG and the armed car of MAT (that they totally stole from MMG), who managed to down one Alpha member.
Upon the Harbor area assault, MMG found a great spot for suppression of the town, however, we definitely should’ve fell back a bit once the IFV rolled out, as we were quite vulnerable on the rocks, but as it was 1 km out, we probably had a false sense of safety, which cost us our gunner’s life. Luckily Platoon with medic was close by to help and MAT was already on the IFV and took it out just after it saw us.
My radio comms could’ve definitely been cleaner and more organised.
The op itself was really fun @Longbeard! Thank you for making it!
I do not have a lot of feedback, and most of it is just personal preference, and nothing concrete.
I feel like at the FOB assault, it would’ve been fun to have some trucks with reinforcements show up down the main road which would’ve given MMG/MAT an urgent target, though I am not sure how pinned down MAT was while Alpha was getting mowed down.
You probably could have also added a bit more to the second storage base location, to spice it up, but that might have screwed with the timing of the op or stretched Alpha out too much.
Lastly, Simplex was fun to use and well set up! Only feedback there would be to add clarification to the opord/briefing regarding which resupply callsign dropped which resupply box.
The plan when I was planning the mission was to have more units come in on trucks/cars/helis, but I toned it down a bit, maybe it became a bit too light.
The harbour and the island became lightly garrisoned as you guessed due to time restraints, and my wish to use the whole AO.
I’m guessing you are asking for clarification on simplex on what each callsign could drop is because you were testing it with me. I ended up reverting to booth callsign dropping all the crates as I could not find out why the crates got messed up when I tried to split the type of crates between the callsign.
I forgot to add: I don’t know if you created the compound on the first objective by hand or if it was some type of composition. Either way, it was beautifully detailed.
Great feedback from everyone! Thanks to the Arba, Karl and Mattdogs for leading the teams so well. There could have been a bit less comms from MMG but I understand you wanted to relay whatever you thought was relevant. Thanks to Arba for doing what looked like the hardest job of managing Alpha and leading your guys from the front!
Looking at CNTR gave me a much better understanding of the overall battle and all the work MAT and MMG did in supporting ALPHA. I was hoping my more task based style was giving was enough freedom to do things your own way but you still had things to do. For the most part I think it worked. Although for the base attack I think I probably should have got Alpha to attack from the direction of where MMG was and gone from there but shouda coulda woulda as Judge Judy says…